 |
| Only some of my too many Pinterest boards |
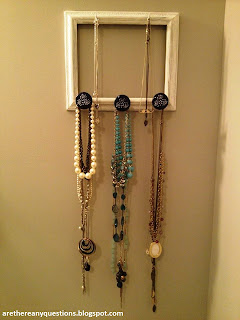
Anyway, back to the point. As much as I might pin WAY to many things, Pinterest is a great source of inspiration. I'm a visual thinker, so it really helps me to be able to see projects, instead of just making "to-do" lists that mostly get ignored. What I've done instead is create "to-do" boards focused around specific projects I want to complete. During my time off we've managed to crank out a couple, and I'll get to those, but today I wanted to show you my new necklace holder.
Inspiration struck with the following photo:
 |
| Via IHeart Organizing |
So, back to the Pinterest board. Were there any good inspiration shots for necklace storage that was similar to the design above that I liked so much? Turns out, there were.
 |
| Via Crafty Clariangel |
| Via Victoria Cassinova |
 |
| Via Life Ann Style |
Turns out I'm a bad blogger and didn't take photos throughout the process, but it was pretty easy.
1. Purchased supplies: frame (goodwill), white paint and sponge brushes (Michael's), blue and white knobs (Hobby Lobby), and white hooks (Kmart)
2. Painted frame white. It ended up with sort of a vintage-y look, which wasn't intentional but I think it worked pretty well.
3. Used C's drill to make holes for the knobs and hooks
4. Attached knobs and hooks
5. Realized the drill bit I used for the hooks was too big, so dug out some gorilla glue to make sure they stuck
6. Hung the whole thing on the bathroom wall, and added my necklaces.
 |
| Sorry for the poor quality, but here is the end result! |
 |
| The whole corner, plus the shelves for my knickknacks. Note the goodwill candlestick bracelet/watch holders! |
Voila! Not perfect, but for one of my first real "DIY" crafts, not too shabby! I have an oval frame that I'm planning to hang with ribbons across for clips and sunglasses, and I am also planning on converting my oatmeal container into a holder for my headbands, rather than using the towel rack.
No comments:
Post a Comment